Sunday, 16 January 2011

Campfire

Within the narrative of the Lady and the Lion, there is a point in which the father goes on the hunt for a rose for his daughter. He travels through the forest and comes across a castle (the tepee) with a beautiful garden behind (the Indian camp), within this garden there is a beautiful rose bush in which he picks a flower from to take home for his daughter. Now when considering this concept in relation to the Wild Western/Native American genre I decided to change this rose bush to a campfire and to have the beautiful rose as a sacred ember from this fire.

Campfire in 1:25 scale form


Mounted onto circular truck measuring 800mm across (scaled to 32mm diameter)

Realising a blazing campfire for the stage

Before attempting to recreate a fire for the stage there are a number of things to consider. The main question being: what is the fire supposed to accomplish? Here I was reproducing a 'blazing' campfire which was not only eye catching but a key interactive element for the performers on stage. It would be there to also set the mood of the scene - reflecting the uneasy yet calming essence of the lion's lair. Another important aspect of design is whether I wanted visible flames or just an indirect flicking glow - as I was reproducing an open campfire I felt visible flames would be correct. For the consideration of colour, every fire is different and every colour has its own meaning. Did I want the colour of a warm glow or a cold heat. I opted for warm glow as after all the campfire I was translating was 'blazing'.

An interesting extract I found in a technical source guide on how to create fire for stage by Michael Powers (see research file for guide) gave me an insight into what the audience would depict from the colours I used.
"The more you use reds, oranges and yellows in flame, the more it will seem hot, searing and arid. Colours in the amber, rose and burgundy range tend toward romantic. Flames that are white hot, blue-white and blue tend to give the audience a feeling of unease, of very intense heat, or strangely enough, of cold heat. Green flashes can give a softening effect to the red range and add an eerie, unworldly effect when used as the main colour or mixed with the white and blue-white flames."

I wanted the fire to seem hot and searing so I decided to stick to the reds, oranges and yellow colour palette. Further research lead me to highlighting these in the Rosco catalogue when looking for suitable colour gels.

These colours would provided the flicking flames within my campfire truck. But how was I going to make these colour come to life in a 'blazing' fire - the answer fans! Further research made me discover how to recreate moving flames for a fake fire.


The illustration above shows how I visualised building the mechanism to recreate moving flames. A small computer fan would be contained and hidden within the campfire logs and operated remotely (preferably having a power supply with the truck - if the set constructors and health and safety would allow it, if not a smaller battery operated fan would suffice.) The air created by the fan would hopefully enable the 'flame shape' colour gels to move. Alternatively having small light and with coloured gels shining upwards at flowing silk would probably be more aesthetically pleasing. (See image below)

Giant Flame Faux Fire Silk


To create the surrounding log structure it would be down to the prop department to create me some authentic looking logs to suit.


One more point, to add realism to the campfire some sort of speaker system could be hidden within the logs to play crackling fire sounds!

See A3 Bible Sheet for Production Realisation of Campfire

Thursday, 13 January 2011

Haunted by AutoCAD error

So today was the day my model box was scrutinised...I thought I had nearly completed my replica of the Margate Theatre with only a few finishing edges to complete. After taking the model box out of the privacy of my room and into the studio, praying eyes were looming over it. A voice said, "Do you think that's right? -(pointing to my apron). And suggested, "You might want to check that on the original drawings". So with reluctance I did and compared my measurements of my model box / printed AutoCAD drawing against the original plans. The result of this to my horror was that I had measured from the wrong point on my apron! Instead of measuring from the proscenium arch line to the edge of the apron, I only measured to the footlights marking. This in turn resulted in my apron being 23mm out or 575mm in reality being half a meter! This fact I just couldn't ignore I had to extend the apron on the model to fit. After 2 failed attempts at re measuring, I finally figured out how to add this extra piece on successfully - at least I could sleep better at night now.


Although due to this corrected error the stage floor I had already produced was to the smaller measurements, no worries I could simply move this floor forward as the painted floor did not need to reach the back wall of the stage as I had a back drop hiding this gap. Actually in reality this gap would allow the people working on the stage to be able to travel from one side to the other without being seen behind the backcloth - see photograph below for visual explanation.


Wednesday, 12 January 2011

Backdrop and Gauzes

A key element in transforming a blank stage into something believable takes a lot of imagination and supportive imagery to portray the intended concept to the audience successfully.

The background of the set plays a huge role - it transforms the stage into something real, sets the scene but in my case also adds depth.

The scene I was focusing on was set in the heart of the Wild Western desert land. When researching this genre I could not escape the fact of the vast surrounding landscape - distant mountains, open skies and weathered looking plants and wild life.

Measuring up for the backcloth

I found it difficult to define the correct size for this element when trying to measure up with a steel rule against the model box. To overcome this I decided to measure smaller dimensions on the model and resorted back to the proscenium arch plan on Auto CAD to draw a template for the backdrop. After printing the new plan I double checked that the dimensions were correct against the model before cutting out a mount board piece.


To enable this part of the set to become interactive in the model box a piece of dowel was glued to the top edge and used to enable the backdrop to be lifted in and out of the model box in a production meeting.


The Gauzes
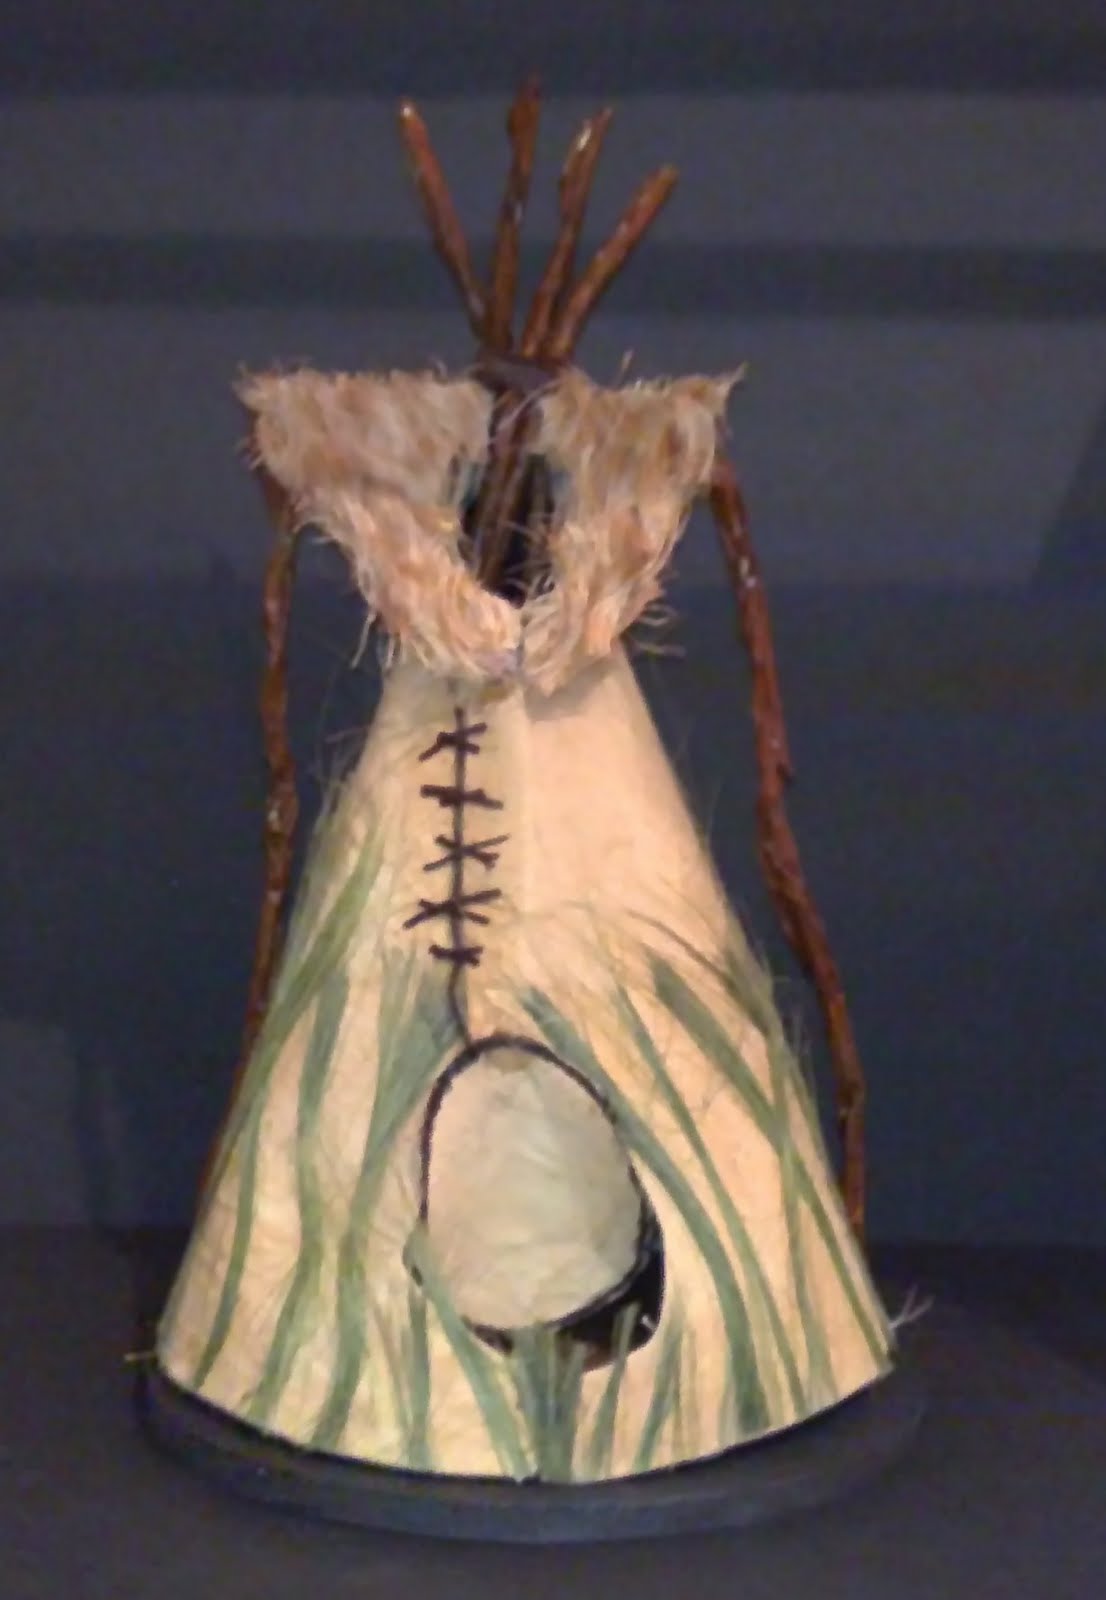
My original idea for this design was to have a Forest of Cacti- the main purpose of this being to hide the Lion's castle (tepee) until the penultimate moment. I was planning to have two large trucks each consisting of a row of approximately 6 cacti. I thought this idea was excellent, a simple yet effective way of creating a 'fantasy forest' on stage...now this was before I actually began to realise my design on the stage I was working with. The Margate Theatre I must admit isn't the deepest stage in the world so when realising my prospective design I soon figured it wouldn't be as successful or impacting as I would have liked it to be. Due to the stage depth I was limited into how long my rows of cacti were.

So after some careful consideration I decided on just 3 cacti per truck, therefore not making the trucks as long. On the plus side, this limitation would in fact make the trucks more assessable and easier to move for its operators (i.e. stage hands or performers). On the other hand by minimising this scenic element to its bare minimum in turn discarded the fullness and depth factor I wanted to portray within the 'Cacti Forest'. No worries, the resolving answer was...the magic of the Theatrical Gauze!

Developing from this I came across a very useful website: http://www.iweiss.com/stage/fabric/scrim.html - it told me all I wanted to know about gauzes and how they are made and worked.

I decided to have more than one gauze to add more depth to the Forest.

Now the dilemma was how to portray this in a 1:25 scale model.

I experimented with drawing onto tracing paper but after experimenting in this the result wasn't that clear.

First attempt at 'Cacti Forest' gauze


The plan was to stagger the two 'gauzes' at a set distance within the model box. Although before getting to this stage I realised the tracing paper I had used was not translucent enough, so the effect I was trying to create wouldn't have worked as well. What I needed was a clear instant visual representation of a gauze.

Next I considered using acetate, now the question was how do I reproduce my original design onto this material. I went to seek guidance from the computer wizards in the IT department and to my delight this method was achievable. My original idea was to photocopy onto acetate but I was guided to scan the images in and manipulate the background in AdobePhotoshop to make sure a transparent background was achieved.

Once I had scanned my original designs for the gauze in, I decided the singular plants didn't really create the 'Cacti Forest' I had originally visualised in my head. My main idea was to create the gauzes in order to hide the tepee from the audience at the beginning of the performance. What I really needed was a fuller forest landscape. I could of spent time slaving away creating two newly painted designs which were fuller, but I was working to a deadline and with a week to go and plenty more scenic elements to create within the scenographic model I decided to scourer the world wide web and manipulate a photograph of a landscape.

Creating Gauze in Photoshop (removing the mountains)


Once happy with the image I scaled it to fit the model box and figured out the correct printing settings to produce it onto a sheet of A3 acetate for the model box. Before printing my seconded gauze I decided to see what it looked like against the background and tepee I had already created within the model box. From this it struck me that all I needed to do was flip the image horizontally in order to create the second gauze. Once I had the two gauzes produced I played around with these in the model box again and was able to see what depth the audience would visualise from these gauzes on the stage. When experimenting with this I realised the back gauze image needed to be higher in order to hide the tepee fully - otherwise the element of surprise would be ruined. So it was back to Photoshop to manipulate the image further (I heightened the image by 200mm and also made it slightly smaller than the image on the front gauze to help with the 'depth' concept.

Gauze against backcloth in scale form


Practical table experimentation of heightening the gauze's height in comparison to the backcloth before editing in Photoshop.


When manipulating the image for the second gauze in Photoshop I used guides to help me alter the height correctly and the clone stamp to repeat and blend my image accordingly.

Screenshot below of work process


Each gauze design was printed onto acetate and framed to fit the model box. The bottom of the 'model gauze' did not have a boarder. This was in order to suggest that the gauze when produced for the actual stage would be made to the whole height of the stage - touching the floor line.

Sizing the frames for the gauze using the Proscenium Arch plan


Two parts of frame sandwiching the acetate in place


After both gauzes were successfully encased in a frame with a piece of dowel running across the top, I could play around with positioning in the model box.

Front View


Plan View - Positioning in rig of gauzes and backdrop


By having the backcloth set at a distance up stage of these gauzes, the painted image on the gauze would appear with more spatial depth. The gauzes would be hung from the flight rig and 'dropped' in and out.

'Roller drops can operate by a single fixed roller that lowers the cloth in effect like a roller blind. The rollers fixed position above unrolls through a handline off-stage. Alternatively, the roller is attached to the base of the cloth. The roller extends a short distance beyond the edge of the cloth on either side. The cloth's top edge is fixed to a batten that is secured above the stage. The cloth is first rolled up to the raised position. Cables that run through pulleys attached to the top batten are attached to the roller ends. The unrolling motion of the cloth while it lowers causes the cable to wrap around the roller ends on either side. Drawing in the cable from off-stage causes the cable to unwind which causes the roller to roll-up the cloth'. (Thorne 1999:162)

By using this mechanism to fly my cloth in would result in the cloth unrolling itself in a downward direction, with the roller positioned on the upstage side of the cloth the painted image of the forest on the cloth would appear to unfold magically before the audience's eyes. This is opposed to a drop cloth being lowered in from above with the bottom appearing first - not as magical. Therefore the latter would be the preferred option for my design to be portrayed to its full potential.

Materials

A sharkstooth scrim (a more densely woven material mesh) would offer more scope when intending to make something appear and disappear magically. As the Father in the narrative travels through the Cacti forest, the forest would gradually disperse before the audience's eyes, take for example moving the trucks and fading the gauzes.
When lit only from in front and above, the cloth would appear solid making anything up stage invisible. Therefore at the beginning of the Father's journey I would intend for this effect to be produced upon the front gauze to translate a full forest in front of the Father.
As the father makes his journey up stage through the forest the stage would be lit from the front as well as lighting the Cacti positioned between the gauzes as this would deliver the illusion of the painted Forest merging together with the Cacti trucks. In order for this effect to work the paint used on the scrim needs to be dye in order to not fill the mesh.

Monday, 10 January 2011

Stage Floor

I thought I'd better think about my stage floor before I went any further making the rest of the scenery. Originally I was going to produce my main design using a revolve floor. Since this original idea my main set ideas have developed to include more scenic elements i.e. a campfire, a tribal flag stand and gauze's to at depth to the overall setting of the 'Cacti Forest'. These additional elements made me consider the revolve idea again and once having thought about it I realised the same effect of the Lion's garden behind (well camp in this genre) would still be able to be revealed to the audience just in a slightly different way.


My original idea was to have the Lion's tepee and campfire on the revolve to later be turned around. My decision to change this application to each property being on a separate truck came about when I realised that in reality Native Indians sit around the front of their tepee with their campfires blazing. Therefore if I was to have the campfire hidden from the audience behind the tepee at the start, once the revolve turned around the tepee would have been facing backwards - resulting in the Native Indian scene being depicted entirely wrong. So my final decision was to have each scenic elements on trucks to be spun or brought in accordingly.

So now it was time to set to producing my stage floor...

It is important to think about the appearance of the floor in order for the other scenic elements of the design to fit. Take for example the painted floor of the movable trucks need to translate the same or similar effect to that of the main flooring as in my case the design wouldn't flow other wise - i.e. the floor of the trucks represents the same floor of the main stage. As I am in the Wild Western genre - full of cactus's and tepees I decided the floor should resemble a desert/sandy yet natural grassy earth ground texture.

Main inspiration image for floor design

This research image reflects the natural qualities in the tepee as well as the ground - just like my interpretation within my design.

I was going to produce my floor with texture but since having read up on 'how to translate your design through the scenographic model' I found that the texture is a vital part in the design translation. If I was to use textured materials such as sand grains or grass to create the stage floor, the set constructors and scenic painters would visualise this same texture in reality just larger. Because of this I realised the floor for the actual set needed to be flat in order for the trucks to move successfully across the stage floor. If I wanted a textured, more realistic natural ground to be reproduced I don't feel my truck design mechanism would have worked as well over the uneven ground.

Stage Floor Production

First I experimented on small pieces of black foam board to see which colour and style created the right looking effect. After deciding on the particular finish I started by painting the mount board black as then the colours used would hopefully behave the same as when the scenic artists realise my design on the actual stage floor - hence being a black start floor to start.


For a naturalistic tone I decided on a burnt umber undercoat.


Working alongside research images I was able to grasp my desired effect.


The stage floor was produced on mount board, therefore it can easily be taken in or out by the director in a production meeting.

Thursday, 6 January 2011

Tepee Production

After realising the actual shape for the model tepee it was down to the overall look and detailing. From the extract on Native American culture I read that the Indians used animal hide to cover the main structural frame (which were tree branches tied with rope). This material would be great to use for the stage but obviously real animal skin would be highly expensive so an alternative would have to be considered.

After going on the hunt for suitable fabrics I came across a selection of felts and fake short haired furs. But still I wasn't sure whether this would suit, so I opted for a medium calico - it has that rough, imperfect feel about it just like something the Indians would have used. For the actual stage I feel this material would be alot thicker, but obviously for the scale model a thinner material was needed to be used.

Now I had the material but it didn't have the right tone to translate 'Lion skin' / forest, earthy habitat to the audience...so I grabbed the kettle and a container, an ample amount of tea bags and black food colouring and set to dying. This took a numerous of attempts to get right, the right colour when compared to my research images took a little time to achieve and the method took a few attempts to get right. On my first experiment I decided to empty the tea out of the bag into the boiling water...but I found this just marked the fabric in blotches with tea granules, how was I suppose to know they wouldn't dissolve! The way that worked best was leaving the tea bags to stew in the boiling water for 5 minutes, then adding the pre-washed calico in for about 30minutes to change colour.

The successful method stewing...

Dyed calico hanging to dry


I also tried dying some light coloured twine - the result turned out well, now I had a suitable material to suggest the Lion's mane on the tepee (smoke flaps covering).


Once dried the calico was pressed - removing nearly all the creases. I must admit I surprised myself with the effect the dye produced on the calico - kind of rich in colour yet patchy in places - just like the tonal factor on the skin of a lion - beautiful.


After pressing the fabric I worked with the template I made when realising my design. I drew the template with a half a centimeter edge all the way round to be able to produce a neat finish when gluing together.

Flat pattern of covering


Once the main part of the tepee was covered it was down to decorating to fit the design. After rummaging around various art shops and collections of bits and bobs I had horded over the year, I realised I didn't have quite the right material to use. What I needed was something to represent long grass, after some thought there was no other option but to dust off my anorak and head to the model railway shop! Well...I must admit I was actually in my element there, so many different textures and little bits to choose from. I came across 'woodland scenic' - a range of scenic materials for model making. After containing my 'excitement' I left with only one bag of grass!

WSFG174
Medium Green Field Grass


http://www.thesignalbox.co.uk/index_new.php?pg=3&p_cat_id=39&prod_id=3144

Flat Pattern of tepee adding scenic embellishments - grass and fur


Following my design and referring to images of actual tepees I realised I need to produce two outer supporting beams as well as the beams (tree branches) for inside the tepee.
For the model I first tried producing these tree branches with modelling clay but soon realised the clay I had was too cheap and was made of a fibrous material. This caused the clay not to be able to be manipulated without becoming wet. This in turn proved useless to create the texture I wanted without waiting hours to dry off.

Failed attempt at tree branches


So I quickly had a brainwave and thought...masking tape! I attempted wrapping around strips of this to the beading wire and to my amazement the effect didn't look that bad.

Make-shift model tree branch stand


Once painted I was happy with my tree branch production effort.


After piecing all the detailing in place with various combinations of glue (pritt stick, PVA, double sized and super glue) I realised the truck for this set piece required some attention from the scenic art department. To keep in tune with the Lion's habitat I decided the truck which the tepee would be mounted on should represent natural ground - so it was all hands to the woodland scenic grass!


I designed the truck a little wider than the tepee base in order to accommodate the stage crew who needs to maneuver this piece of scenery during the performance.


Final checks were made against the figure and scale rule before I was happy with this part of the model.

See additional Bible Sheet for realisation of this set piece.

Wednesday, 5 January 2011

Lion's Flag Stand

Initial Design


Many Native Indian camps have animal hide stretched and tied to tree branches - providing a type of wind brake in and around their camp. I have used this idea to add to the feel of the camp setting being produce and to also give the audience some visual aspect in relation to the plot. This additional scenic element is to reflect the authority and sense of ownership of the scene towards the Lion.

A tribal flag showing a Lion's silhouette imprinted onto lion skin is hung on a tree branch stand tied with ropes. The material to use for stage would have to be some thick calico, that's then painted to achieve correct finish.

For the stage this scenic element (actually all of my scenery) would be based upon a truck. This would allow the nature of this production to follow better (hence all the transitions from forest, to castle, to behind the castle) as the set pieces would be easily moved into position by stage hands or the actors themselves. The basic truck size I have decided to be 125mm high, therefore 5mm high in the model to allow for casters to be safely mounted underneath the truck for the production.

The photograph below shows the truck construction for the 'Flag Stand'. A piece of foam board was cut to size and neatened with a black outer edge of card, this would later be covered for decoration purposes to match the set dressing.


The making of the flag stand for the model

After stretching out my trusty tape measure again and carrying out some careful calculations - I set to making this part of the model.
The flag stand was to consist of 3 tree branches supporting the tribal flag.

First a wire frame was constructed, later bulked out with masking tape to provide the branch type texture.


The wire was pressed between a pair of pliers as after playing around I found this technique imprinted just the right scale pattern into the masking tape to suggest the surface of a tree branch.


After carefully selecting the colours : a mixture of raw sienna and burnt umber with a light touch of 'opaque oxide of chromium' (basically sap green!) my branches were complete.


For the model the flag was to be a small scale suggestion of animal hide - I thought of just painting a piece of calico to achieve this effect or sticking a printed texture of lion's fur onto it. But to go one step more I decided to try my hand at texturing with actual tiny bits of twine to produce the desired effect.


I started with a base of calico cut to size then cut the piece of twine into small pieces - after gluing this to the calico (first with doubled sized sticky tape then a layer of PVA over the top) I realised the scale of the tiny pieces of twine was too large! So I attempted the same process again this time making sure even smaller bits were cut.


A scaled down template of a lion wearing a crown was produced on Adobe Photoshop, which was then printed and cut out with a scalpel and later stuck on with layers of PVA!

Once dried I could attach the 'flag' to the stand - this was done with miniature scaled rope to fit! (A very fiddly process).

Final 1:25 scale model

The Lion's Castle...or is it?

Through text analysis and set ideas coming into play the main focal point of this scene has changed dramatically since the original concept of a grand castle. To communicate this object within the Western/Native American genre, I have taken on the styles of the Native Indian tepee's and have considered the elements within them and have designed some in different styles.

Originally I decided to portray a traditional western tepee, this moved on to being more grand in design developments and finally becoming more 'animal' like. The design I decided to settle with was the one I felt communicated the Lion qualities yet still gave the grandness essence.


Final design sketch
Details: smoke flaps - made of lions fur to look like its mane / main material sandy colours, a fine hessian or calico material cover / tree branch supports / long grass along bottom / circular opening - to reflect animal like habitat.

When the time came to transfer my water coloured sketch into reality (well in 1:25 model form!) a template was needed to be made (now who would of thought a template would be so time consuming) Firstly I had to decide upon a sensible size - I wanted to communicate the grandness of a castle so a large scale was chosen. (4m height with approximately 2.5 m width) My trusty scale ruler became very useful here when working out how big this would be 25 times smaller! And when I wanted to check how big I was asking the set constructors to build I stretch my tape measure out across the room in true designer fashion!

The template of the tepee's structure wasn't the easiest object to figure out laid flat. To accomplish this, mock ups were made and played with - starting off with simple cone shapes and eventually achieving the desire shape to fit my design sketch (During this part I used various homemade methods of constructing this template, take for example embedding pins in a mound of blue tack to provide an anchor for a homemade string operated compass all for one 320mm arc!)


The image above shows one of the first templates. After mocking this up, I realised the smoke flaps (extra material at the top of tepee) didn't quite match the shape I designed - now I nearly moved on and said that'll do. But subconsciously I couldn't move on without correcting this error as it wasn't what I really wanted and designed , so more accurate shapes were cut out to fit.

The overall look I feel comes down to mainly shape, size and texture. In order to gain the right look for this scenic element contextual research was needed to be carried out.

This extract (below) from an interesting blog I found on Native American culture explained to me and supported my design choices.

'The Native people made the American Indian tepee out of an armful of small but strong trees all cut to equal lengths. (Supporting structure to be tree branches) They would tie these together with a rope type material that was made from animal sinew and then they would use an animals hide to cover the hand made frame. (My design would hopefully reflect the skin of a lion / lion's habitat) A door was also made out of a piece of the hide and there was also and inner layer of animal hide, so both sides of the frame of the American Indian tepee were covered. When finished the tepee was an A-frame structure and the top would have flaps that could be opened or closed to allow smoke to escape. The base was also made wider so there would be plenty of room for the fire.

Fire was another integral part of the Native American Indians lifestyle, so the creation of the American Indian tepee was perfect since it allowed the Indian people the ability to have their own fires to cook with in their homes.
(Fire - additional scenic element to include in design). The other great thing about the tepees was the fact that they were so mobile, and the nomadic tribes could just take them apart very quickly and move them as they followed the buffalo. (My design would be made on trucks - not only for performance purposes but also to reflect the traditions of the Native Americans lifestyle) Other times the American Indians would have to move their homes quickly to avoid the stampeding buffalo, which would occur frequently since they lived in such a close proximity of the buffalo. (Much like the Lion's tepee appearing within the cacti forest when the father and servant approach on horseback). The buffalo hide was the main hide that the American Indian tepee would be made from, and many times the tribal families would decorate the outside of their tepees with their family of tribal symbol. (Additional scenic element - Lion's flag stand)'.

Now I can leap from this extract and go forward in my research into realising my design for the stage.